Overgrown Oasis is the 8th stage in Super Mario 74 Extreme Edition. Completion of this course requires the activation of the metal cap switch.
This stage is found in a warp painting on a high ledge in the first overworld. Mario will need to use the cannon to reach this ledge, so it cannot be accessed until Mario can pass the Star door that the Bob-Omb Buddy is behind.
This stage is a mirrored remake of the Overheating Oasis from Super Mario 74, albeit with a few twists. The main area of the level is flooded, and the sand and palm trees that once covered the upper area have been replaced with a lush grassland, and leafy trees similar to those surrounding Peach's Castle. There exists only one patch of quicksand in this stage, beneath the mostly-destroyed Pyramid of Tutanpokey.
Acts[]
Star 1: Still Under Construction[]
As the name suggests, this Star is found at the wooden scaffolding in the middle of the level, just like Star 1 in Overheating Oasis. Mario can swim to the central stone structure and climb the winding slope around this structure to reach its top. There are some Kuromame on the last platform of the wooden construction, and a flamethrower halfway up the stone structure, but otherwise climbing the scaffolding is the same to how it was done in Overheating Oasis. The difference only becomes apparent when Mario reaches the last scaffolding platform, with the Kuromame on it: The star isn't just above this platform as it was in Super Mario 74. Instead, there are two thin, very tall wooden pillars in the air a short distance away from this platform. The Star is at the very top of these two pillars, so he will have to wall kick back and forth between them to gradually rise upwards until he reaches it.
Star 2: Flood Landing Stage[]
This Star requires the Metal Cap. Because there are not enough coins in the stage to collect the 100 coin Star without reaching the top of the flood landing stage, it's recommended to go for both of these Stars at the same time. To reach this Star, Mario will have to climb to the top of the wooden platform rising high out of a barren corner of the flooded course, where the oasis was originally. Since the platform's top is far out of reach normally, he'll have to find another way to climb it. Just like before, Mario should climb up the central stone structure to the base of the wooden construction. If he drops off the side of the structure, right next to the first scaffolding platform, he'll land on a wooden ledge hidden off the edge of the stone structure. A Metal Cap is on the far end of this ledge, and he should grab it and take it to the base of the flood landing stage. A Purple Switch is on the ground beneath it, and Mario must press it just before his Metal Cap wears off. This will create a single timed box just above the water level, between two legs of the tall platform. After getting on top of this box, Mario must carefully wall kick back and forth between these two legs to climb up to the top of the platform. He'll have to be extra careful as there's a flamethrower just below the top of the platform, ready to end his attempt. Even if he dodges the flamethrower, he needs skill to angle himself up and over the edge of the platform to land on top of it, and two Kuromame wait there to try to burn him and send him right back into the water far below. If he makes a mistake at any point, he'll need to go collect the Metal Cap and retry the entire process over again, but if he can survive these obstacles, 20 coins and a star wait on top of this platform.
Star 3: Not So Secret Secret Anymore[]
Mario must again find the (no longer secret) secret star hidden on the back of Thunder Mountain. From the start, go right and climb up the low ledge here to reach the grassland area of the course. Mario should go to the far end of the grassland until he reaches a dark green slope, representing the level's boundary. Mario can jump kick his way across this slope to reach the small patch of flat grassland on the other side. From here, it's a simple jump into the open entrance of the nearby mountain. Though some flamethrowers and Kuromame have been added, it shouldn't be that much harder to climb than it was in the original game. Once Mario reaches its peak, he has to jump down into the hidden alcove behind the mountain. The star is visible in a lower, deeper alcove that he can reach with the added momentum of a jump kick.
Star 4: Doubtful Pyramid[]
Just like in the original stage, there is a star on top of the Pyramid of Tutanpokey. Unlike the original stage, the pyramid is nearly destroyed, with only a sloped, winding exterior part of it remaining. To make matters worse, flamethrowers surround this pyramid, and a large patch of quicksand surrounds its base to ensure that any mistake is an instant death. Mario can reach the pyramid by climbing up to the grassland like before, where it will be visible a slight distance away. Once at the base of the pyramid, there are a few different ways he could climb it: Since Mario won't slip so long as he's crawling, he can crawl up the entire winding path if he can time his movement to avoid the flamethrowers. Alternatively, he can try using a triple jump to nearly reach the top of the pyramid, bypassing all of the flamethrowers and requiring only a few kicks to reach its peak. Finally, he can angle himself to face downwards so he will be constantly sliding down the steep sloped path on his butt, while jump kicking to keep moving himself backwards along the path. No matter how he does it, he'll eventually reach the tiny flat area on top of the pyramid, from which he can jump up into the star.
Star 5: Hidden Hermit[]
Another fairly easy star to collect, assuming you know where it is. Follow the steps in star 3 to reach the top of Thunder Mountain again. From here, instead of jumping off the back of the mountain to reach star 3, Mario should let either the Kuromame or flamethrower light him on fire and use the burning speed to climb up to the very tip of the mountain. The tip is a darker color than the rest of the mountain's texture, and it's actually a fake texture that Mario will walk straight through. The star is hidden beneath this tip, so Mario will collect it as he walks through the fake texture here.
Star 6: You Shall Drown![]
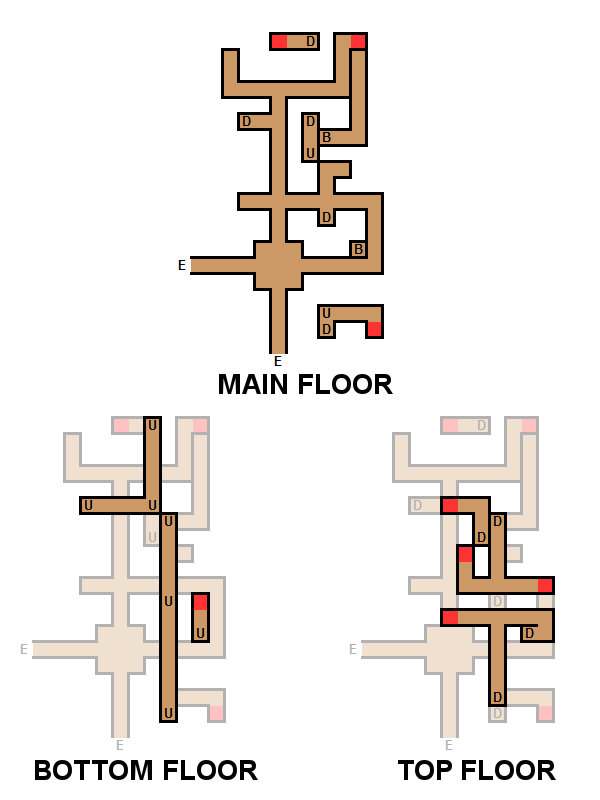
As the name suggests, all of the this level's red coins are located under the water. Specifically, they are located inside the labyrinth just below the water level, directly in front of Mario's starting position. The labyrinth is much larger than it was in Super Mario 74, with three floors and a myriad of dead ends. And since the main and bottom floors of this maze are underwater (except for the large room near the entrances to the main floor), letting Mario take his time in mapping it out is not an option, lest he risk drowning. It is recommended to regularly surface for air, either by taking any path up to the top floor or by leaving the maze completely to swim above the water level in the main area of the course. The path to each red coin is as follows:
- From the southern entrance, swim all the way forwards to the end of the long corridor, and follow the path to the first red coin.
- From the first red coin, swim back the way you came, and take a left to reenter the long corridor. Then, take the first right to reach an opening beneath Mario leading to the leftmost room of the bottom floor. Go through this opening and swim forwards, then take a left to reach an opening above Mario. This opening leads to an isolated section in the main floor, on the north side the maze. The second red coin is in this section.
- From the previous red coin, swim back down to the bottom floor, and swim forward to where the path turns. There is another opening above Mario here, which leads to a tiny path towards the top floor of the maze. Mario can breathe in this air-filled passage, and the third red coin is at the end of it.
- Retrace your steps back to the southern entrance to the labyrinth. Reenter the maze and take the second right, then take another right to reach another passage down to the bottom floor. Swim all the way forwards to the southern end of this long corridor, and Mario will reach a passage back up to the main floor. In this isolated southern section of the main floor, just turn right to reach a red coin at the end of this path.
- From the previous red coin, swim forwards until Mario arrives at another hole in the ceiling above him, leading to the southernmost room on the top floor. Go forward to the end of this hallway, and turn left to find the next red coin.
- From the previous red coin, turn around and walk to the east end of this hallway. A tunnel extends straight down from this room to the bottom floor, where Mario will be directly in front of another red coin.
- Retrace your steps to reach the long corridor on the bottom floor. Turn around to face north and swim all the way to the end of this corridor. It will end in a tunnel that leads straight up to the top floor. At the end of this hallway, turn left to find a red coin.
- From the previous red coin, Mario just has to turn around and go to the west end of the hallway (as if he had turned left instead of right). The red coin is just around the corner.
With all eight red coins collected, the star will spawn outside the labyrinth, right by Mario's starting position.
Enemies[]
- Pokey
- Chuckya
- Kuromame
- Piranha Plant